• Skip to main content
  • Skip to secondary menu
  • Skip to footer
  • Home
  • About
  • Subscribe
  • ☕ Support
  • ✉ Contact
    • Contact Me
    • Request Product Review
    • Work With Me
    • Submit Guest Post
  • Blog Archives
Nutty Hiker Adventures Logo

Nutty Hiker Adventures

Hike Every Hike Like It Is Your Last

  • Hiking >>
    • Hiking Articles
    • Hiking 101 >
      • 10 Essentials of Hiking
      • Types of Hikes
      • Trail Etiquette
      • Hiking Terms & Jargon
      • Hiking First Aid Kit
      • What to Bring On Every Hike
      • Pre Thru-Hike Checklist
      • Hacks to Lighten Your Backpack Weight
      • How to Avoid Norovirus While Backpacking
      • Choosing a Sleeping Bag Liner
      • How to Poop in the Woods
      • Gift Guide for Hikers
      • Books for Hikers & Backpackers
      • Movies About Hiking
      • Subscription Boxes for Hikers
      • Thru-Hiking Trails Bucket List – USA Edition
      • Your Hiking Questions Answered
    • Long Trails >
      • Appalachian Trail
      • BamatoBaxter
      • Greenbrier River Trail
      • Lone Star Hiking Trail
      • Pinhoti Trail
    • Rails To Trails >
      • Greenbrier River Trail
    • Gear Reviews
    • Ask Nutty Hiker
  • Camping >>
    • Camping Articles
    • Camping Gear Reviews
  • Survival >>
    • Survival Articles
    • Survival Gear Reviews
  • Destinations >>
    • The Ultimate Road Trip Checklist || Adventure Safely
    • State Highpoints
    • National Parks & Forests >
      • Black Hills National Forest
      • Guadalupe Mountains National Park
    • Arizona
    • Arkansas
    • Colorado
    • Idaho
    • Kansas
    • Kentucky
    • Louisiana
    • Maryland
    • Nevada
    • New Mexico
    • North Dakota
    • Pennsylvania
    • South Dakota
      • Black Hills National Forest
    • Tennessee
    • Texas
      • North Texas
      • Central Texas
        • San Antonio
      • East Texas
      • South Texas
      • West Texas
      • Texas State Parks
      • Guadalupe Mountains National Park
    • Utah
    • Washington
    • West Virginia
  • Road Trips >>
    • The Ultimate Road Trip Checklist || Adventure Safely
    • Road Trip Ideas
  • Motorcycle >>
    • Sturgis 2024
  • News >>
    • Outdoor News
    • Interviews
  • Video’s
  • Photography >>
    • Latest Work
    • Photography Gear Reviews
    • Portrait Portfolio
  • ✎ Logbook >>
    • My Daily Antics
    • Ask Nutty Hiker
  • Resources >>
    • Recommendations
    • The Ultimate Road Trip Checklist || Adventure Safely
    • Hiking Essentials Checklist
    • Morse Code Converter || Send a Message in Morse Code
    • Military Time Converter
    • Message Encryption & Decryption
    • Message Transformer
  • Shop
    • My Artwork
    • Merch Store (T-Shirts & More)
You are here: Home / The Logbook / How to Switch Your Wordpress Site from HTTP to HTTPS (SSL)

How to Switch Your WordPress Site from HTTP to HTTPS (SSL)

October 5, 2017 by Nutty Hiker Last Modified: October 5, 20177 Comments

Google announced a while back that they would start giving search result priority to those sites that have an SSL Certificate (hosted under a secure connection). These steps will show you how to switch your WordPress site from HTTP to HTTPS

The process to change your WordPress site from HTTP to https is relatively simple. These steps are only for self-hosted WordPress sites.

Steps to Switch your WordPress Site from HTTP to HTTPS

  1. Purchase and Install an SSL Certificate for your domain. You can purchase this certificate through many different sources such as Namecheap or even your hosting provider (I suggest just buying one from your hosting provider and letting them handle it aka save yourself a headache).
  2. Verify that the SSL was installed correctly. You can verify by putting https://www.yourdomain.com into a website, make sure to change www.yourdomain.com to your own domain
  3. Create a Backup of your WordPress Files & Database! I do this anytime I make big changes. While this isn’t a huge change, it is still wise to do so!
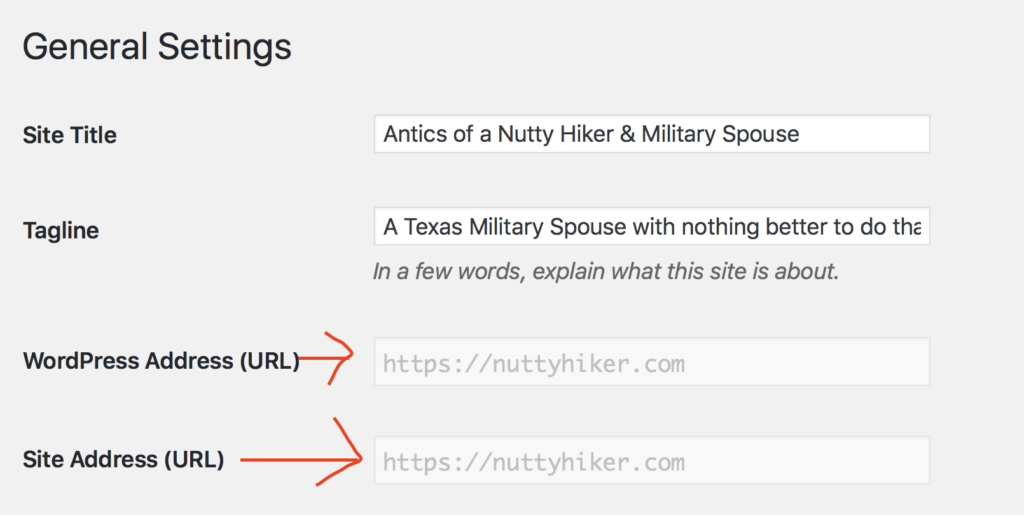
  4. Change the URLs in WordPress. After you have verification that the SSL has been installed and is working you need to change the  Wordpress address AND site address to reflect https instead of HTTP. If it is grayed out like the picture below, you will need to make this change within your wp-config.php file. Wordpress Site and address URL Settings
  5. Create a 301 redirect for all pages on your site. The simplest way to do this is to enable SSL in iThemes Security (if you have it installed). If you don’t then you can either do it through cPanel (assuming you have access) or through the .htaccess file on your server. If you are going the .htaccess route, you would put the following code AT THE VERY BEGINNING of your .htaccess file:

    RewriteEngine On
    RewriteCond %{HTTPS} !=on
    RewriteRule ^/?(.*) https://%{SERVER_NAME}/$1 [R,L]

  6. Verify the new site with Google Search Console. Since you are now using https you will need to verify the new domain with Google Search Console (formally Google Webmaster Tools). Just click the red Add Property button at the top right. Make sure when you input the URL that it starts with https. Google Search Console "Add Property"
  7. Update Google Analytics. If you are tracking your site stats with Google Analytics (and you should be) make sure to update the properties there as well! Do this by clicking on the Admin link on the left sidebar. Click property settings under property. Then choose the https dropdown under the default URL. Click save at the bottom to save your changes.Google Analytics
  8. Update ALL URLs on your website that point to HTTP URLs. After you have updated your URL in step 3 above, you may notice that hardcoded URLs in menu’s, posts, widgets, etc… did not change. No worries there is an easier fix than going through the hundreds (or like me) thousands of links. Install the Plugin Velvet Blues Update URLs (it is free). Once installed you will find it under tools on the left side in your WordPress admin panel. NOTE: This will only fix URL’s that are for your own domain name.
  9. Update URLs to images hosted on another domain. This one is a little more time-consuming. However, not all images will need to be updated.
  10. Check to see if you have mixed content. If you have mixed content (http and https properties) it could cause an invalid security notification to users. To fix this see the “No lock in the URL bar” below under known issues & their fixes.
  11. Always use https://www.yourdomain.com from here on out. This means whenever you comment on other blogs, or anywhere you may place your link.

Known Issues & Their Fixes

Images Will Not Show – If you have images that will not show after the move to https that is hosted on your own site, check to see if you have hotlink protection enabled (through your cPanel). If you do, make sure to add the https version of your domain to the whitelist.

No lock in the URL bar – When you switch to https, you should have a lock in your address bar which tells visitors your site is secure. If you don’t, then that means there is an issue which is most likely due to mixed content (a mixture of HTTP and https). The easiest way to find the issue is to use Google Chrome. In google chrome, navigate to your website. Click the 3 verticle dots at the top right and then choose More Tools > Developer Tools then click Console. You are looking for anything in yellow that says Mixed Content.

Have questions about switching your WordPress site from HTTP to HTTPS? Comment below and I will try and answer them!

SaveSave

SaveSave

SaveSave

SaveSave

SaveSave

SaveSave

SaveSave

SaveSave

SaveSave

SaveSave

Filed Under: The Logbook

Reader Interactions

Leave a Comment or Suggestion Cancel reply

Your email address will not be published. Required fields are marked *

Comments

  1. The Crumby Vegan says

    October 13, 2017 at 1:49 pm

    So it turns out that my site is already https… Did I just get lucky? :)

    Reply
  2. lea kucherovsky says

    October 13, 2017 at 1:54 pm

    I am always needing help with my blog! This is awesome advice!

    Reply
  3. Ashley says

    October 14, 2017 at 1:43 pm

    I have been wondering lately how to do this, I’m glad I stumbled across your content, I pinned it!

    Reply
  4. Nicole Anderson says

    October 14, 2017 at 5:25 pm

    Such an extremely interesting and useful post for anyone who has a http site. I learned a lot from this information, thank you.

    Reply
    • Bridget Carlson says

      October 14, 2017 at 7:10 pm

      You’re welcome!

      Reply
  5. Brown Sugar (@bsugarmama) says

    October 16, 2017 at 3:21 pm

    My hosting company has been nagging me to do this for a while. I know I need to. I think your blog post was a sign.

    Reply
  6. nickanton says

    November 9, 2017 at 2:30 pm

    Just what I needed to get my Google webmaster analytics back on track!

    Reply

Footer

FOLLOW

  • Facebook
  • Instagram
  • YouTube
  • RSS Feed
  • Amazon
  • Patreon

SUPPORT =)

This blog is my full-time job. I rely heavily on support from my readers. If you would like to help offset the cost of running this blog and my nutty adventures so I can continue to bring you travel & outdoor adventures, please feel free to donate =)
PayPal
Cash App
Venmo

DISCLOSURE

Per the FTC, This website contains affiliate links, advertisements, and sponsored posts. For reviews, I was provided with a complimentary copy of the item unless otherwise stated. As an Amazon Associate, I earn from qualifying purchases using the amazon links located on my website. Read my full policy here.

AWARDS/ASSOCIATIONS

OWAA Member Logo Best Outdoor Blogs Best Hiking Blogs

Copyright © 2025 — Nutty Hiker Advenures | Bridget Carlson • All rights reserved.
The links on this website are solely for the convenience of our visitors. Nutty Hiker does not endorse, operate, or control external websites.
Terms of Use • Privacy Policy• Disclosure• Contest Rules